TrailTech Panoram install on a 2000 KTM 300 MXC

Have you ever been out riding and come across a new trail that you would like to explore, but you have already been riding for a hour and you are not sure if you will have enough gas to make it back? Well having an odometer on your bike would help you make the decision of when to turn back for more gas. Unfortunately the 2000 KTM 300MXC did not come with a stock odometer, so it was necessary to find an aftermarket product to provide the desired information. One day I came across the TrailTech website. They offer a product that not only will tell you the mileage you have traveled but much more information such as:

·        Current Speed

·        Average Speed

·        Maximum Speed

·        Distance

·        Odometer (track total miles)

·        Riding Time

·        Trip Time - stop watch

·        Accumulated riding time (track total hours)

·        Clock

·        Lubrication reminder

·        Maintenance reminder

What else could you need? GPS? Sorry not included in this model. But I ordered it anyway directly from the website and in 3 days it had arrived at my front door. Now all I had to do is get it installed...

I opened the box and began to get myself familiar with the new gadget. I started with reading the Quick Start instructions and in a very short amount of time was able to have the computer setup and ready to be installed. The installation appeared to quite simple on this bike according to the directions. There are only 3 steps to follow: 1) mount the magnet into the already existing hole located on the front brake rotor, 2) Drill a hole in the front brake caliper mount and mount the sensor, 3) Follow the front brake cable up the fork and install the computer. Wait a minute, back up, did it say "drill a hole in the front brake caliper mount"? Yep, sure did and in bold print it says use a sharp drill bit! So off to the store I went to pick up a new 1/8" drill bit. I have to admit I was a little anxious about having to drill a hole into the caliper mount so I wanted to make sure I had a good bit to make a clean drill. I also spent a lot of time "testing" the location I would be mounting the sensor.

Step 1: Mounting the magnet

The kit for the KTM came with 2 magnets. One had a retainer the other was just a magnet. For this installation I used the retainer magnet. It easily popped into the hole already existing on the brake rotor. You can see the black retainer for the magnet on the left side of the picture. On the edge that you can see, there is a lip on the retainer that holds the magnet from going all the way through the hole however on the back side it is necessary to install a snap ring (which is included) to keep the magnet from coming back out. If you don't have a set of snap ring pliers this is probably a good time to get some, or you can do what I did and pry the snap ring open enough with a screwdriver to get it installed then close the ends together again with some needle nose pliers. However I am sure this weakens the integrity of the snap ring. I went to the only hardware store open at 9pm to get some ring clip pliers but they were out of stock, so I had to make due with what I had. All in all this step wasn't difficult, now onto step two. Commence with the drilling...


Notice in the above picture the tiny black mark where I had decided to drill the hole into the caliper mount. If you look closely it looks like the front of pacman is about to eat the mark. If I had it to do again I would make sure I moved the hole about 1-2mm lower. Instead of the bottom of the hole hitting pacman's lips it should be half ingested. I came across an unexpected problem which occurs when you actually tighten down the sensor and route the cable. I think a slightly lower drilled hole would have alleviated the problem.

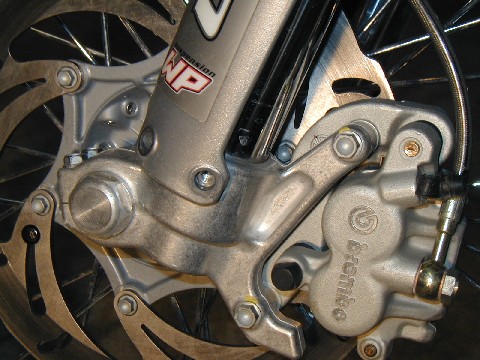
Step 2: Drilling and mounting the Sensor

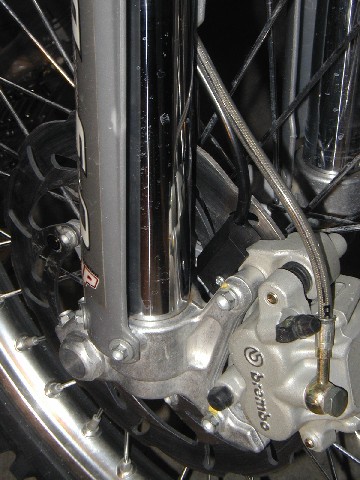
The new drill bit made quick work of the soft caliper mount. I thought for sure that I had the optimum placement for the hole but as it turns out just a little bit lower would have been better. Once I complete drilling the hole I mounted the sensor and tightened the self tapping screw down. I also routed the cable with the brake line up to the mounting point on top of the fork guard, then I inspected the installation. What I noticed was the sensor was barely rubbing the rotor 
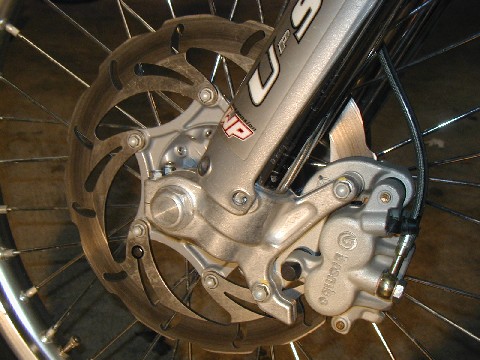
and the magnet would actually collide with the sensor. Now what caused 
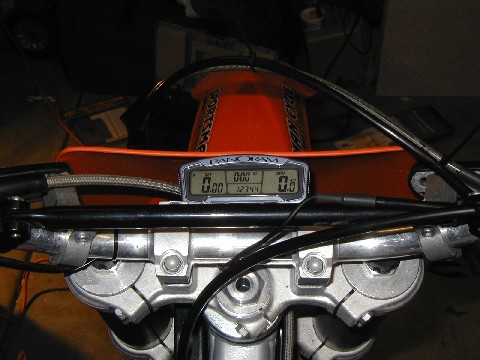
that, I thought. After spending a long time trying to get the wheel to spin freely by adjusting the cable and not having any success I decided I needed to do something else. I contemplated the need to drill another hole in the caliper, but with the one I already made I didn't think that would be a good idea, not to mention there wasn't the room for another hole. So next I thought some washers properly placed would move the sensor back enough, but decided against that when I came up with the big idea.

Instead I thought a rubber like material would be better to place between the sensor and the caliper mount. Well it just so happens that the Panoram is shipped with plenty of the right material. I wonder if they intended for it to be utilized like this? I cut a piece off of the material and trimmed it down to the shape I needed. I left the material about 1/4" thick and mounted the caliper back on. It appeared a little better, but I was still have having some problems with the magnet making contact with the sensor and the sensor being too close to the rotor. So I took some more time trying to figure out how to remedy this and re-contemplated drilling another hole. While sitting on the opposite side of the sensor mount and tire I pushed on the sensor back towards the caliper and noticed with that pressure the gap widened between the sensor and the rotor. Hmmm...I investigated further and noticed when I applied pressure, the gap between the bottom of the sensor that goes over the caliper mount and the caliper mount widened. Now I just needed to make a wedge to fit into that location . So back to the material that shipped with the Panoram computer. I used a flat head screwdriver and pushed some of the material into the gap. Things were looking much better now. After two small pieces of material I was satisfied with the gap between the sensor and rotor and gave the wheel a spin. This time there was no collision with the magnet and the sensor. So I figured that should be sufficient.
I am now several hours into the project of this 3 step installation and finally have the magnet and sensor installed. This picture better shows the top portion of the sensor that covers the caliper mount. It also shows how close the sensor is to the rotor. I wonder how the heat from the rotor will affect the sensor unit? You can also see the magnet in the picture. With step two completed, finally, it is on to step three.


Step 3: Cable routing and computer installation

This was probably the simplest step however it did require some fabrication to mount the computer as shown. Since the MXC does not come with a factory odometer mounting plate it would be necessary to mount the computer to the handlebars utilizing the hardware included in the kit, or come up with a custom solution to mount it. I really wanted to mount it behind the front number plate to protect the computer, not to mention I like angle it gives while riding. Believe it or not I found an excellent solution for about a dollar. You will need to make a trip to a local home improvement store such as Home Depot or similar. The KTM top triple clamps have three threaded holes behind the number plate. The center one is used to mount the number plate the other two will be utilized to hold the fabricated computer mount. First you will want to pick up two 6mm 1/2-3/4" length bolts that will thread into the triple clamps. Then swing by the lumber section and get a 2" metal brace used to support 2x4 right angle connections or something.  See pictures below. The only identifying feature on the brace barcode was "GA1". This will become your mount for the computer. Be sure you have a 5/16th's drill bit or a 3/8th's to drill a couple holes in the mount.

The two predrilled holes on the brace will very closely line up to the outer holes on the triple clamps. You will want to widen these holes using a 5/16th's bit. Also the holes are a little uneven, so you should make slot hole which will allow you to adjust the mount so the computer is not crooked. Then you will need to measure the distance to drill a hole so the number plate can be mounted to the center hole on the triple clamps. Once you have determined the correct location to drill the hole in the mount for the center hole mark it and drill a 5/16th hole through. You should now be able to mount the bracket to the triple clamps. Using the two 6mm bolts that you just purchased mount the bracket to the triple clamps utilizing the outside holes. Now that the bracket is mounted to the bike you will want to place the computer in the location you would like and make an outline of the mounting base that came with the computer on the bracket you just installed. Then get your 1/8" drill bit and a tape measure with centimeters. You will want to make a parallel horizontal line (not pictured) 1 centimeter below the top line you made when outlining the mounting base on the bracket. Then measure 1.5cm from the left and right lines created from your outline inward and make a plus sign utilizing your line drawn previously.
This is where you will drill two holes in the bracket which you will use to attach the mounting base to your fabricated bracket. Once the holes are drilled mount the base using the self tapping screws provided in the kit. Now mount the computer to the base and replace the front number plate. Everything should line up and all that is left is routing the cable as you like. Notice in the picture here you can just see the TrailTech logo printed on the front side of the computer. One feature I like about this mount is no one is able to remove the computer without removing the front number plate. A simple added measure of security. Now I just need to get some riding time to see if it was worth all the trouble.

I've gotten some rides in and am happy with the product and service I've received from TrailTech. Be sure to read the update.

Back to Desertmx maintenance